Fingering charts are also today the primary source for amateurs and professionals to understand and literally grasp how musical instruments work and which capacities lie within them. Regarding woodwind instruments, they give information on standard and trill fingerings, but also on alternative fingerings, border areas as well as flageolets, multiphonics and microtones. There exist plenty of historical fingering charts for the recorder, starting in the 16th century[1], so we can follow the recorders development throughout the centuries quite nicely. In combination with the repertoire of each epoch, we also learn how and in which instrumentation the recorder was used up until now.
Fingering charts for the recorder with completely closed or open holes are coherent and there is no doubt where to put which finger to produce a certain note. Although at this point one could start a big discussion about dynamics, air pressure, embouchure and left thumb technique. These aspects are never mentioned in fingering charts, but being dependent on one another, especially regarding the tuning of the whole instrument. As soon as one includes shadowed and half-opened holes, even more question marks will arise. I am sure, that every recorder player experienced this situation at least once in his or her life: while exploring an instrument, checking fingerings with the chart, having no clue how to produce some of the notes (especially in the 3rd octave), ending often in a wrong conclusion like e.g. the instrument is not very good, the recorder maker had no idea of what he or she was doing, the chart is incorrect, etc.
As Silvestro Ganassi already wrote in his treatise in 1535[2]: „Should you happen to come across recorders that are incorrectly voiced, or in an unusual way, you should proceed as every experienced lute player does who, when he finds himself obliged to play on a strange lute; he examines it thoroughly in every respect. Should he find a false string, he does the best he can by re-tuning or by using other fingering. You should do likewise. Should you have to play a recorder made by a master who is unknown to you, proceed as I show you in the following diagrams. Should you still be unsuccessful in any of these ways, you should try opening and closing one or two holes a little more or a little less, and you should also regulate the force of your breath. In this way, you will find out how to play any kind of recorder. As well you know, when Nature cannot help, Art must be your teacher.”
This intuitive way of exploring an instrument is certainly a good way to go, especially with an instrument like the recorder, which is one of the most sensitive instruments when it comes to air pressure, air stream, articulation, embouchure and finger holes – I am not even talking about temperature, humidity or instrument variety here. The challenging fact is, that every human is different. And what is normally regarded as one of the most beautiful, but also necessary conditions on this planet – diversity – can and will cause some irritation and confusion when it comes to recorder fingering charts as well as recorder playing techniques. While studying a fingering chart, one should always keep in mind, that shape of fingertips, length and nature of nails, length and shape of fingers, left thumb and general shadowing technique as well as even finger sweat will influence the fingering chart.
The Helder Tenor is based on pure harmonics and therefore works a lot with shadowed fingerings in the 3rd octave. This principle is not at all some sort of side appearance and was mentioned in treatises for recorder[3] as well as other woodwind instruments[4] long before. The main goal also then was, to facilitate the attack and to guarantee a well-balanced sound quality in the 3rd octave. This means, that one doesn’t need to force his or her way up to higher registers through extreme air pressure[5].
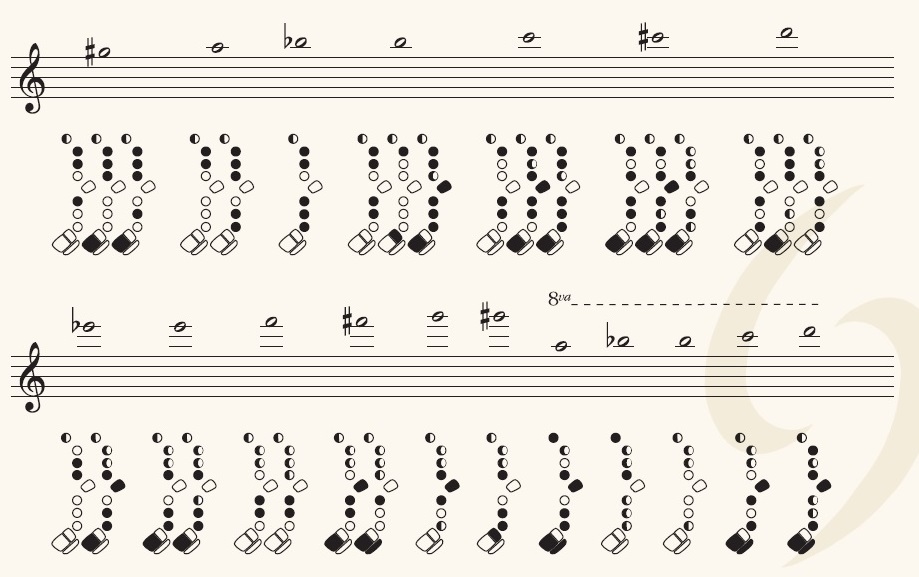
The following three fingering charts, which I have worked on in the last view months, are suggestions for standard fingerings, dynamic fingerings (for piano and forte[6]) and Lip-control fingerings (for pianissimo in the 3rd octave). They will give you an idea, how far you can go on the Helder Tenor and of course can help you find even more fingerings. The position of the block has a lot of impact on the attack as well as on the sound quality of each note. Therefore, you need to know that these fingering charts are made for a standard block position. From there you can take it further and experiment with different positions. You probably will realize that e.g. a narrow wind channel will create a lot of disturbance in the 3rd octave, whilst a wide wind channel will create a quite easy and fluty sound in the 3rd octave, but only reaching up to approximately B’’’. Although the Helder Tenor comes with three different materials of platelets for the windway roof, I am mainly using the Synpor platelet. This material can absorb fluids while not expanding at the same time. This is quite some advantage, since there is less limitation on performing and studying this instrument time wise than e.g. with one of the two wooden platelets. They are made of Grenadilla and Rosewood – both noble woods – and they of course do expend while playing and therefore have limitation time wise, but also sound wise.
Standard fingering chart:
Let’s assume that one intuitively uses a kind of “mezzoforte” on every standard fingering – knowing that a “mezzoforte” in the lowest register differs from a “mezzoforte” in the upper registers – in general looking for a good balance through all octaves though. At the temperature of 20° Celsius, the tuning pitch on my instrument is at A’=443Hz.

Dynamic fingering chart:
In general fingers in piano should be quite loose. Pressing down fingers will never work on this instrument. Within the forte fingerings, one really needs to experiment with articulation. I was looking for stable fingerings, which should give a lot of freedom in the tone production. But as with any other recorder, the attacks will vary from register to register; exceptions in dynamics are marked in the fingering chart.

Lip control fingering chart:
From the 2nd register on, the lip control is slightly increasing the pitch, so one will find different fingerings in the lip control fingering chart in comparison to the piano fingering chart from the 3rd register on. Mainly one to two fingers are responsible for the stability of a tone, depending on the position of nodes and antinodes of the air column. The more finger on the instrument are, the more stable the tone will be and the more likely you can make descrescendo to niente and vice versa.

While working on a new piece of music, one will eventually want to notate fingerings of specific tones within the score to be able to remember them immediately. I have developed a sort of short-cut notation to save space but also to save time. A graphic fingering chart is of course more coherent, so this so-called short-cut notation only exists to read faster. Based on my own experience within the last few years, I can recommend following coding:
P = piano key (‘+’ = pressed = open; ‘-‘ = released = closed)
O = thumb hole
Ø = half open
1 = left index finger
2 = left middle finger
3 = left ring finger
8 = B-key = left pinkie finger – be aware that 8 normally equals the bottom hole; since the Helder Tenor has an extension note and therefore one extra key before the bottom hole, we should keep numbers in the correct order.
4 = right index finger
5 = right middle finger
6 = right ring finger
7a = Eb-key/D#-key = right pinkie finger
7b = C-key = right pinkie finger
7c = C#-key/Db-key = right pinkie finger
bh = bottom hole
I = 1st register
II = 2nd register
III = 3rd register
etc.
x = piano fingering
+ = forte fingering
LC = Lip control
[1] Sebastian Virdung „Musica getuscht und außgezogen“(Basel & Strasburg, 1511). You can find a summary on recorder fingering charts online: http://www.recorderhomepage.net/technique/fingering/bibliography/ (last checked: May 2017)
[2] Silvestro Ganassi „Opera Intitulata Fontegara“(Venice, 1535)
[3] e.g. Silvestro Ganassi „Opera Intitulata Fontegara“(Venice, 1535), Pablo Minguet y Irol „Reglas, y advertencias generales“(Madrid, 1754), P.F.E. (Pater Ferdinand Everard ?) „Principes pour la flute“(Stift Melk, 1770)
[4] Michel Correttes “Méthode raisonnée pour apprendre aisément à jouer de la Flûtte Traversière”(Paris, 1773), Armand Vanderhagens “Méthode nouvelle et raisonnée pour le houtbois”(Paris, ca. 1792)
[5] Nik Tarasov „Hoch hinaus. Zum Spiel der dritten Oktave im Kontext des Hochbarock“, in: Windkanal 2/2008; p. 18-24
[6] With special thanx to Johannes Fischer, who introduced me to these fingerings.
References
Bowman, Peter: Klangfarbe im Blockflötenspiel; in: Windkanal 3/2016, p. 24-29
Fischer, Johannes: Die dynamische Blockflöte (Celle, 1990)
Van Hauwe, Walter: Moderne Blockflötentechnik, Band 1-3 (Schott, 1987)
Tarasov, Nik: Harmonische Blockflöten. Die Geschichte einer neuen Blockflötengeneration; Windkanal 2/2004, p. 14-21
Thalheimer, Peter: Beobachtungen zum Überblasverhalten von Blockflöten – Alte Bauprinzipien als Ausgangspunkt für neue Instrumente?; in: Tibia 1/1995, p. 362-368
Thalheimer, Peter: Wieder aktuell: die Blockflöte mit Extension. Ein Beitrag zur Geschichte eines Baumerkmals; in: Tibia 2/2015, S. 427–438
Veilhan, Jean-Claude: The Baroque Recorder in 17th- and 18th- century performance practice; Paris, Alphonse Leduc, p. 60/61
Vetter, Michael: Il flauto dolce ed acerbo; Edition Moeck

While I appreciate the work put into compiling this, the charts are impossibly tiny to read!
LikeLike
Hello, thank you for your comment. Actually, you can easily safe the files on your computer and either print them on A3 format or zoom in on your computer.
LikeLike
Dear Wanderer, you can enlarge the charts on the computer or print them in A3 format. Then it should be fine.
Best wishes, Susanne
LikeLike
Try 0,1(3/4),2(3/4) 4(3/4),5(3/4) for E”” If you experiment with opening the thumb just the tiniest amount you can get a nice clean tone. You fingering works fine as well. I have found that I can almost get the highest C# up to pitch by slightly opening ALL of the pinky keys. You can do it by depressing them all half way. I love what you have done. I am working with my colleague, Emily O’brien to come up. With a trill chart for the third octave. I expect that there are some which have no options. Have you done a trill chart?
LikeLike
Thank you very much for your reply, Roy! I prefer your fingering for the E”” and it even works for B”’! The tones sound much more stable.
I will certainly publish also a chart for trills in the third octave – in comparison with the further developed version of the Helder Tenor.
Let’s keep in touch 🙂
LikeLike
Thank you for this fingering compilation. I had struggled with the second octave e-flat fingering recommended by the manufacturer. I found a more in tune fingering on my own and felt re-enforced when I found it in your compilation I will be sure to consult your compilation of fingerings as I begin to venture into te third octave.
LikeLike
Dear Vincent,
thank you very much for your reply! The fingerings for the 3rd octave I have found are very stable and will make it much easier for you to perform within this wider range.
However, the final quality and attack will always be dependent on the voicing of your instrument. And tuning is very much depending on the bore.
The newly developed version of mine makes tuning, quality and attack even better and a lot easier.
More to come up soon!
LikeLike